


How to Trim Sugar Glider Nails – Complete Guide & Tips for Beginners
How to Trim Sugar Glider Nails can seem like a daunting task, especially for new owners, but it’s an essential part of their care routine. Proper nail trimming keeps your sugar glider comfortable and prevents injuries to both your pet and yourself. In this guide, we’ll walk you through a simple, step-by-step process to ensure a stress-free experience for you and your furry friend.
1. Do You Have To Trim Sugar Glider Nails?
The answer is YES! Trimming your sugar glider’s nails is essential for their health and comfort. Without regular trimming, their sharp nails can snag on bedding, toys, or your clothes, which may lead to painful injuries. Additionally, long nails can scratch you during handling or bonding time. Regular nail care ensures a safer, more comfortable environment for both you and your sugar glider.
2. How Often To Trim Sugar Glider Nails?
You should trim your sugar glider’s nails every 2 to 4 weeks, depending on how quickly they grow. Monitor their nails regularly – if you notice them becoming sharp or catching on fabric, it’s time for a trim. Consistent trimming keeps the nails at a manageable length and prevents discomfort or injury.
3. How to Trim Sugar Glider Nails?
Trimming your sugar glider’s nails can feel like a delicate task, but with the right tools, techniques, and a little patience, it becomes manageable—and even stress-free. Here’s what you need to know.
3.1. Essential Tools for Trimming
You don’t need fancy gear, but the right tools make a big difference:
- Nail Clippers with a Good Grip: A professional nail trimmer is ideal for precision and comfort.
- Scissors with a Groove: These small scissors help guide the nail, making trimming smoother.
- Human Nail Clippers: In a pinch, standard human nail clippers work fine, just go slow for accuracy.

3.2. Understanding Nail Anatomy
Before you start, know where to cut. Sugar glider nails have a curved tip and a sensitive area called the “quick,” which contains blood vessels.
- Where to Cut: Trim only the curved, sharp tip of the nail.
- Avoid the Quick: Cutting too close can cause pain and bleeding. If you accidentally cut it, don’t panic—cornstarch or pressure can stop the bleeding quickly.

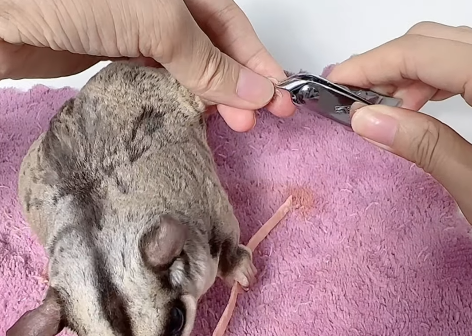
3.3. The Trimming Process Step-by-Step
Step 1: Prepare the Setup
- Place your sugar glider in a soft pouch or wrap them in a towel. Add a treat inside to keep them calm and distracted.
- Have your pet nail clippers, cornstarch or flour (in case your pet is bleeding), and treats ready.
Step 2: Secure One Paw
- Slowly and gently pull out one paw at a time.
- Press lightly in the middle of the paw to spread the nails apart. Keep the paw steady to avoid sudden movements.
Step 3: Trim the Nails
- Use pet nail clippers to snip off only the sharp tip of each nail.
- Avoid cutting the pink “quick,” as it contains nerves and blood vessels.
- If you accidentally cut into the quick and bleeding occurs, apply a small amount of cornstarch or flour to the nail. Gently press to stop the bleeding.
Step 4: Special Care for Back Paws – On the back paws, leave the two fused grooming toes untouched. Trim the other three nails only.
Step 5: Reward Your Glider – Once finished, offer extra treats to create a positive association with nail trimming.
4. Sugar Gliders Nails Trimming Tips
Team Up for Success
It’s easier to trim nails with two people: one to hold the sugar glider and the other to do the trimming. Consider using a magnifying glass and a forehead light to keep your hands free and see those tiny nails clearly.
Choose the Right Time
Perform nail trimming during the day when sugar gliders are naturally calmer and less active. This reduces stress and makes the process smoother.
Bathroom Break First
Before you begin, let your sugar glider stretch and explore the cage for five minutes. This gives them time to use the bathroom, so you don’t end up with any “unexpected surprises” during the trimming session.
Provide a Secure Environment
Sugar gliders feel safer when snug. Wrap them in a soft towel, cloth, or even their favorite pouch. You want them to feel hidden and secure—some may even drift off to sleep! A calming glove can also work wonders if your sugar glider tends to be fidgety.
The “Fleece Burrito” Trick
If your sugar glider struggles, gently wrap them in a “fleece burrito,” ensuring the head is covered, and the body is snugly secured. Keeping them immobile prevents injury from sudden twisting movements.
Distract with Treats
A little bribery goes a long way! Keep your sugar glider preoccupied by offering their favorite treats, like yogurt drops or mealworms, while you trim. This keeps them focused on the reward instead of the trimming.
Learning how to trim sugar glider nails takes patience and practice, but it’s well worth the effort to keep your glider healthy and happy. By following the steps outlined and using positive reinforcement, nail trimming can become a routine part of your bonding experience. Remember, consistency and gentleness are key to making this process smooth for both you and your pet.